Showing posts with label all natural. Show all posts

Thursday, December 6, 2012

DIY Beef Dog Chews

If you own a dog, then no doubt you'll agree that your canine is just as much a part of your family as your spouse or kids. So of course you'll be including Fido in your holiday gift-giving! This year, I decided to make my dogs Lucy, Susse and Buddy homemade beef chews for their Christmas gifts. Of course I let them sample some ahead of time and they loved them!

These chews are incredibly easy to make and super inexpensive. Better yet, they're super healthy. Store-bought dog chews and treats often contain additives and preservatives, just like a lot of 'human food.' By making the chews at home, you know exactly what you're feeding your dog. Also, if you're an 'all-natural nut' like me, making them from scratch gives you the opportunity to add wholesome ingredients to make them that much healthier! (See below for flavor suggestions that pack a healthy punch!) Your pup will love these stocking stuffers, and I hope you enjoy making them as much as I did!

Flavoring ideas and their health benefits
You can develop your own custom flavors by adding different herbs and spices to the beef before drying. Aside from the additional flavor they bring, incorporating these ingredients into their treats can be very beneficial to your dogs health. Since I'm a big fan of herbs and spices used for health purposes, and a strong believer in their effectiveness, I've decided to share a list of a few herbs that may be helpful in alleviating and/or preventing health problems in your dog. Of course, your dog doesn't have to be suffering from any of these issues in order to enjoy these flavorings- He'll just be enjoying a super delicious snack that happens to be healthy, too!
 
Bad breath - Parsley, Rosemary
To repel ticks and fleas - Garlic
Digestive discomfort - Ginger, Catnip, Chamomile, Basil
Inflammation (arthritis, injuries, skin irritations, etc) - Chamomile, Rosemary, Basil 
Anxiety/nervousness - Chamomile, Catnip
Boost immune function - Garlic, Ginger, Sage, Oregano
Infection - Sage, Oregano, Thyme

Complete list of safe herbs for dogs

Feel free to mix and match and experiment with different herbs and spices- just make sure to research an ingredient to be sure it is safe for dogs before using it in the chews. I don't recommend adding salt, as too much sodium is not good for your dog. Also, avoid using spicy seasonings, like black pepper or cayenne.

What You Need

Very lean beef - Beef top round steak, flank steak or rump roast
Dried herbs or spices of your choice (optional)
Butcher twine or string
Wire rack (I used a cookie cooling rack)

 Method

Slice the beef (with the grain) into strips, about 1/4 - 1/2 inch thick and 4 - 6 inches long. (For easier cutting, place the meat in the freezer prior to slicing just until ice crystals begin to form)

Pat meat dry with a paper towel

If you're seasoning the meat, roll the strips in the herbs or spices of your choice, or sprinkle over top.

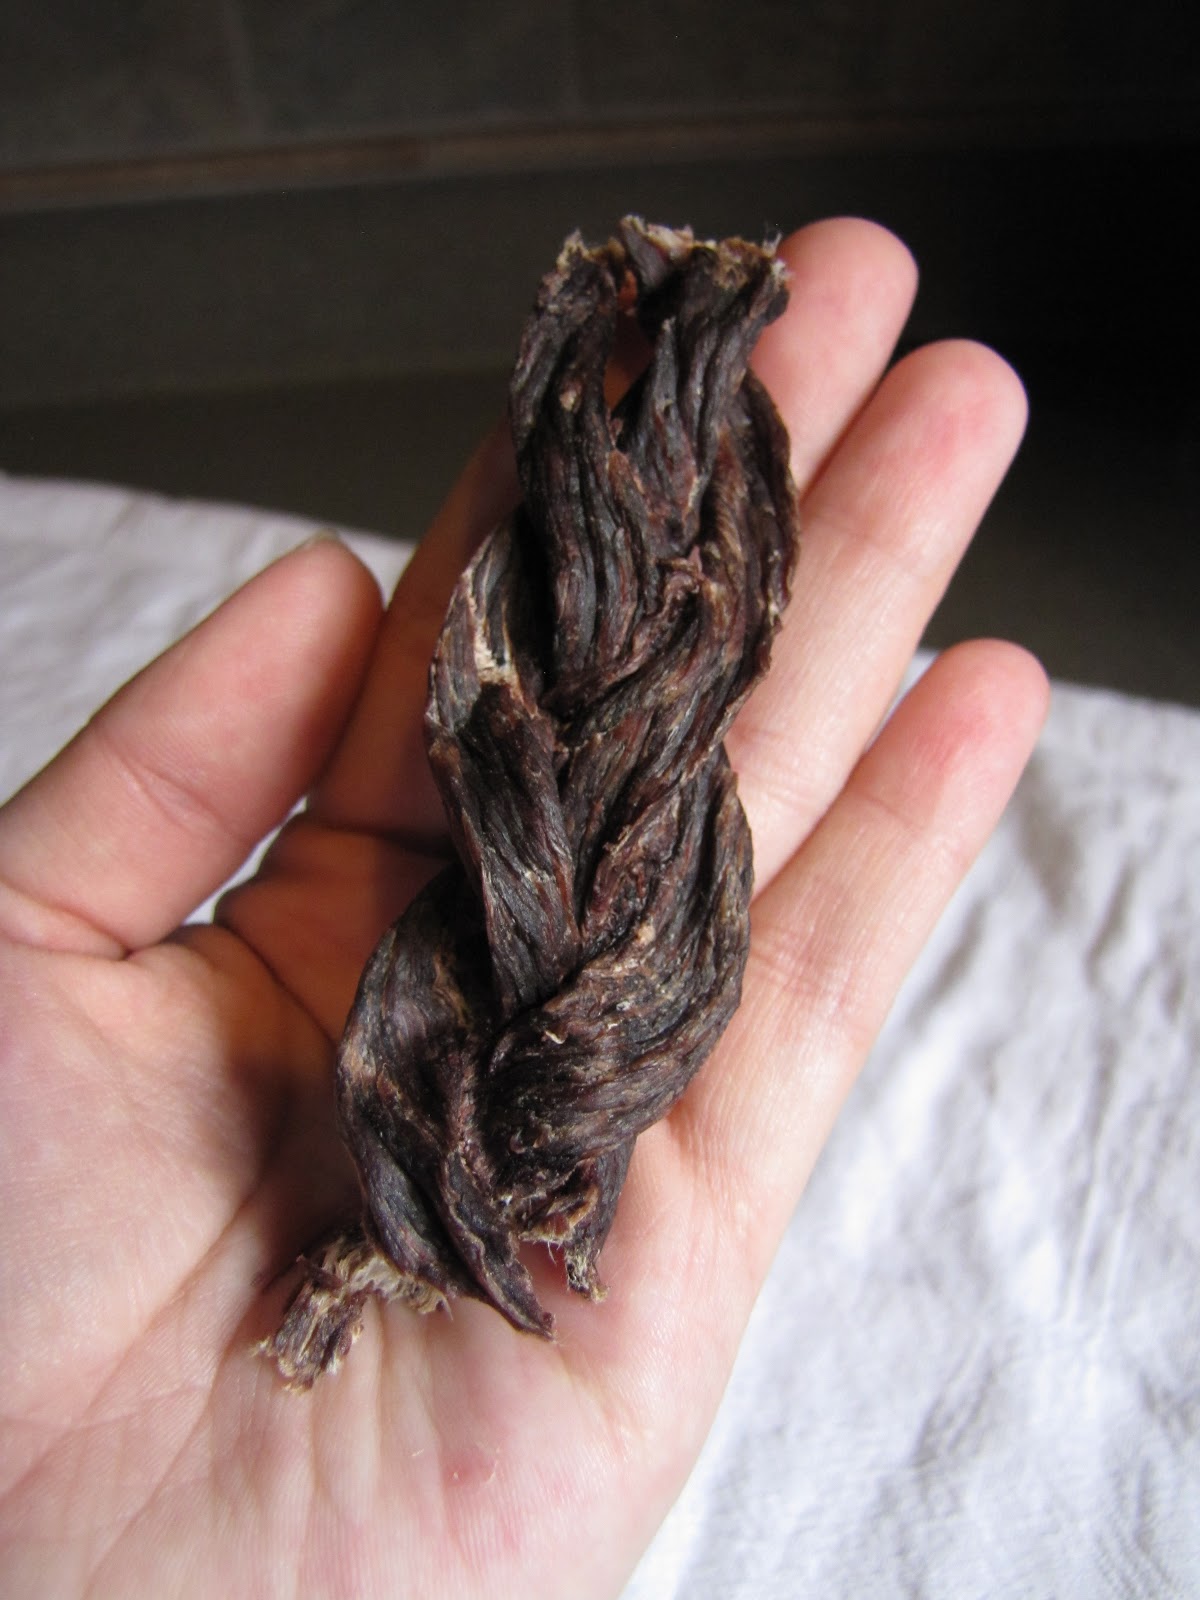
Use a piece of twine to tie 3 strips of meat together at one end. Tightly braid the strips, then tie the bottom ends together with another piece of twine.

Use the convection setting on your oven, and heat to 130 degree Fahrenheit. (Convection is ideal, because it circulates the air around the meat.) If your oven does not have a convection setting, heat to 150 degrees and leave the oven door open a crack.

Place braids on wire rack and put in oven. Cook for 4-5 hours. Turn down the oven temperature to its lowest setting and continue cooking braids for several hours. My oven's lowest temperature is 100 degrees, so I left the braids to finish drying overnight. If your oven does not go that low, just use the lowest possible temperature and allow the braids to dry another 3-5 hours. The braids are finished drying when they have shrunk to about half their size, are a dark color and are hard.

Untie the ends of the braids. The braids are ready to be devoured!

Store in an air-tight container or zip-top bag. 


Happy Holidays!

Thursday, October 25, 2012

Garbage Disposal Cubes: Naturally Deodorizes and Cleans


This week's tutorial is for an all-natural and easy solution to smelly garbage disposals. These cubes use citrus peel, baking soda, borax, salt and water to not only deodorize but clean your garbage disposal. The citrus works in two ways: The oil from the peel leaves a wonderful, fresh fragrance, and the acid helps eliminate odor-causing bacteria. The baking soda deodorizes the disposal and also works as an abrasive cleaner along with the borax and salt to get rid of grime and build up. They're not only easy to make but easy to use: Just toss one in with some running water, turn on the disposal and voila- A clean and deodorized garbage disposal!

I always feel so wasteful when I throw away the citrus skins after juicing them. It takes a lot of lemons or oranges to get just a little juice! I knew there had to be a use for the unused portions, and this is a great way to put the leftovers to use! Each time you juice a lemon, lime or orange, put the peels in a zip-top bag and store them in the freezer. When you've saved up enough, just thaw them out and they're ready to be made into Garbage Disposal Cubes.

Note: I used limes because they were on super sale when I bought them, but you can use limes, oranges or lemons, or a combination of the three. It's totally up to you. However, since the fruits vary in size, you'll need to adjust the amount of peels needed depending on what fruit you use. Before measuring, cut the peels into about 3 inch pieces.

Makes about 18 cubes

Ingredients
  • 2 cups juiced citrus skins and peels ( about 6 limes OR 3 lemons OR 2-3 oranges) -do not use the juice
  • about 1/2 cup water
  • 1/3 cup baking soda
  • 1/4 cup Borax
  • 1/4 cup any type coarse salt (I used epsom)
Method

Use a food processor to combine citrus peels with enough water to make a wet paste, about 1/2 a cup.

The moisture should be wet but not runny

Stir in the baking soda, Borax and salt.

As soon as I added the baking soda, Borax and salt, the mixture turned neon yellow!
Spoon the mixture into ice cube trays and press down lightly to pack each cube. Transfer trays to freezer.  Once the cubes are totally frozen (several hours), pop them out of the ice cube trays and store in the freezer in a zip-top bag.


Please forgive the poor photos, my condo has terrible lighting!
 
To deodorize and maintain daily or after each use, turn on cleared garbage disposal and add one or two cubes with running hot water.

To deep clean or for very heavy odors, add three or four cubes to garbage disposal with 1/2 cup water. Turn disposal on and off very briefly. Let sit for 1/2 hour, then turn on disposal with running hot water to clear.

Saturday, October 13, 2012

How To: Make a Lotion Candle


I love this project! I first saw a lotion candle at a cute little boutique in northern Wisconsin, and fell in love with the idea. When I was a kid, I used to dip my fingers in the warm wax of my mom's expensive candles, leaving little wax dribbles on her table and fingerprints in her candles. When I saw the lotion candle for the first time, I immediately felt like a little kid again, excited to dip my fingers in the wax! But this candle is meant for putting fingers in!


This lotion candle is made with Cocoa and Shea butter, moisturizers which have low melting points and are easily absorbed into the skin. Beeswax is also added for a more solid consistency. The candle has a wick like a typical candle, but once melted and allowed to briefly cool, the wax can be massaged into skin to moisturize just like lotion. Not only do the essential oils nourish the skin, but they create a wonderful fragrance that will brighten any room!


What Are the Benefits?
I like to make each and every beauty product with incredibly nourishing ingredients, and this lotion candle is no exception! In addition to the deeply moisturizing Beeswax and Cocoa and Shea Butters, this invigorating lotion candle also contains Rosemary, Lemon, and Orange Essentials Oils, as well as Jojoba Oil and Vitamin E Oil. Here's a brief summary of the health benefits of these oils:


Rosemary, Lemon and Orange Essential Oils are all found to be stimulating, improve circulation, and contain astringent, anti-inflammatory and antibiotic properties.

Jojoba Oil is a very effective moisturizer, often used to treat acne and other irritating skin conditions due to it's antimicrobial and anti-inflammatory properties. Jojoba oil also contains Vitamin E, Complex B Vitamins and several minerals.
Vitamin E Oil is an indispensible ingredient in skin care products. Vitamin E acts as an antioxidant, protecting skin from damagin free radicals, and helping heal already damaged skin cells. It promotes the production of collagen and elastin and helps the skin retain it's natural moisture.

Feel free to experiment with various essential oils to create different scents that you love, and try out different oils, like almond or olive oil, in place of the Vitamin E and Jojoba oil to create a customized moisturizer! Just make sure you keep the proportions of oil to Beeswax, Cocoa and Shea butter the same, otherwise the consistency of your candle will be off.


Let's do it!

What You Need
  • Wick from a tealight candle
  • Small heat-safe ramekin or candle mold (I like to melt the ingredients in the same dish that will hold the candle, it's one less dish to clean!)
  • Wax warming stand OR microwave
Ingredients
  • 1/2 tablespoon (4g) Cocoa Butter
  • 1/2 tablespoon (8g) Shea Butter
  • 2 g Beeswax (if you don't have a scale, cut a square of beeswax that's 1/2 inch wide, 1/2 inch long and 1/8 inch thick)
  • 1/8 teaspoon Jojoba Oil
  • 5 drops Vitamin E Oil
  • 5 drops Orange Essential Oil
  • 3 drops Lemon Essential Oil
  • 2 drops Rosemary Essential Oil
Beeswax, Shea Butter and Cocoa Butter
Vitamin E, Lemon, Rosemary, Orange and Jojoba Oils

 
Method
 Combine the Cocoa Butter, Shea Butter and Beeswax in a small heat-safe ramekin or mold. Use a wax warming stand or microwave to melt the ingredients. (If using a microwave, heat in 10 second intervals) Add all the oils and stir to combine. 
Melting

Once melted, very carefully position the candle wick at the bottom of the dish


 Allow to cool and harden completely.


There you have it, a lotion candle! When it's time to burn the candle, blow out the flame and allow to cool for just 2 or 3 minutes before massaging the warm 'wax' into your skin. Enjoy!

Saturday, October 6, 2012

How to: Make All-Natural Dish Soap


Did you know that with just a few simple ingredients, you can make your own All-Natural Dish Soap?

What are the benefits of making my own dish soap?

1. There are no harmful chemicals or additives
    Although store-bought dish soaps are considered 'safe,' they include chemicals and other additives. My theory? If I can't pronounce the ingredients, I don't use it! I like to know exactly what goes into every product I use, and the best way to do that is to make everything from scratch.

2. Homemade dish soap is less expensive than store-bought dish soap.

3. You can easily customize your dish soap recipe to your liking!
     See notes below

So what's in it and how does it work?

This dish soap recipe contains Tea Tree Oil, Grapefruit Seed Extract and vinegar, all of which are considered antimicrobial. The vinegar helps prevent water spots, and the Orange Oil and Extract create a fresh smelling product. The finished product is a fairly thin consistency and because it doesn't contain lathering agents, it won't bubble as much as a store bought soap. But don't worry! It cleans just as well as the thick, bubbly stuff!

Let's get started!

Ingredients


  • 1 cup warm water
  • 1 oz and 10 grams pure glycerin soap, finely grated         
  • 1 tablespoon and 1 teaspoon vinegar          
  • 1/8 teaspoon Tea Tree Oil                                            
  • 12 drops Orange Essential Oil
  • 25 drops Grapefruit Seed Extract
  • 1/4 teaspoon Orange Extract
Method

In a medium mixing bowl, slowly stir together the glycerin soap and water until the soap has dissolved completely. Add the vinegar, Tea Tree Oil, Orange Essential Oil, Grapefruit Seed Extract and Orange Extract and slowly combine. (You don't want to mix the soap quickly, as it will create foam.)


Set aside for about 1 hour. As the water cools, the dish soap will thicken just a little bit. If you would like to adjust the thickness, this is the time (See notes below)

Using a funnel, pour the dish soap into a container of your choice. I like to use a clean olive oil bottle with a pour spout.

There you have it! Your very own all-natural dish soap!

A few notes

*For a thicker dish soap, add more glycerin soap, for a thinner dish soap, add more water.
Since this soap doesn't create much lather, it can be used in your dishwasher. Add a tablespoon to the detergent dispenser. If you add more glycerin soap to the recipe for a thicker consistency, it may alter the amount of bubbles the soap creates- so be careful not to add too much to your dishwasher if you made a thicker soap!

*You can find glycerin soap at health food and craft stores (like Hobby Lobby or Michael's). Tea Tree Oil, Orange Essential Oil and Grapefruit Seed Extract can be found at health food stores, and Orange Extract is found in the baking section of your grocery store, near the vanilla extract.

*You can easily customize this recipe by using other essential oils and extracts instead of orange. Lavender and peppermint also make wonderful smelling dish soap!


Let me know how your dish soap turns out!

Saturday, January 29, 2011

Recipes for Hair, Face and Body

Americans have become obsessed with what we put in our bodies. Organic food sales rise every year, and many families have made the choice to buy food products free of pesticides, antibiotics, preservatives and other chemicals. Our country spends millions of dollars every year on diets, detoxes and supplements and smoking is taboo. If we're so conscientious about what we put in our bodies, why aren't we more concerned about what we put on our bodies. If you use body lotion, you know that it doesn't just sit on top of your skin. Instead, it gets absorbed, much like how our bodies absorb nutrients from foods we eat. There's a rule of thumb that if you can't pronounce it, don't eat it. This should ring true for hair, face and body products as well. Methylchloroisothiazolinone (also used in glues and fuel products), Benzophenone, Disodium lauroamphodiacetate? These are just a few ingredients listed in common body and face washes, and unless you have a Bachelor's degree in English, I doubt these are easily pronounced. Instead of just nourishing our bodies from the inside out, let's start nourishing from the outside in as well.

I've been a fan of making my own body products since I was a little girl. My mom never knew if the concoctions in the fridge were for eating or for my face! While my friends were buying expensive hair treatments, I was slathering my locks with mayonnaise. When my friends were buying ten different bottles of acne wash, I was spreading honey on my face.
I've done extensive research on the benefits of natural foods on hair, face and body, and have written several recipes that I would use over store-bought products any day. Not only are homemade body products much healthier than store bought products, but much cheaper as well. Below are a few of my favorite beauty recipes, as well as a list of ingredients and their benefits. Feel free to use my recipes as a guide and mix and match to create your very own body products.

Feed your skin!
  • Honey: Antiseptic, contains antioxidants
  • Olive Oil: Moisturizer, contains antioxidants
  • Sugar: Exfoliant
  • Coffee Grounds: Exfoliant, caffeine which tightens skin, stimulates blood flow
  • Coconut: Antiseptic, moisturizer, contains antioxidants
  • Almonds: Exfoliant, contains Vitamin E, contains antioxidants
  • Green and Black Tea: Contains antioxidants, antibacterial properties, anti-inflammatory
  • Oranges: Contains Alpha Hydroxy Acids which sloughs off dead skin cells and promotes growth of new skin cells, contains antioxidants, anti-inflammatory

Remember, these recipes include perishable ingredients and should be used immediately or refrigerated in an air-tight container for up to 5 days.

Bring your scrubs, masks, moisturizers and rinses into the shower in an air-tight container to avoid getting them wet. You should always shave before using a body scrub, so your skin can get fully exfoliated.

Tropical Body Scrub

Makes enough for one treatment

This is a great exfoliating scrub with orange juice and lemon juice to slough off dry skin.

  • 3/4 cup granulated sugar
  • 1/4 cup brown sugar
  • 1/4 cup shredded coconut
  • 1 tablespoon honey
  • 3/4 teaspoon grated ginger root
  • 1 teaspoon grated orange zest
  • 2 tablespoons orange juice
  • 1 teaspoon lemon juice

Combine sugars, coconut, ginger and orange zest. Stir in honey, then lemon and orange juice. Shower as usual, then turn the shower head so you are not in the water. Rub the scrub over your entire body in circular motions (to stimulate blood flow), applying light pressure, for five minutes. Do not use this scrub on your face. If possible, wait an additional five minutes before rinsing. Rinse with warm water. Once dry, follow with an all-natural body lotion.

Wake-Up Exfoliating Scrub

Makes enough for one treatment

This scrub is a great way to start the morning. The caffeine from the coffee grounds stimulate blood flow and tighten skin, and the acidity from the orange juice leaves your skin feeling clean and silky.

  • 1/4 cup brewed coffee grounds
  • 1/2 cup granulated sugar
  • 1/4 cup almonds, ground
  • 3 tablespoons raw cane sugar (brown sugar if you don't have cane)
  • 2 black tea bags
  • 2 tablespoon orange juice

Combine coffee grounds, sugars, almonds and contents of the tea bags. Stir in orange juice. Shower as usual, then turn the shower head so you are not in the water. Gently massage the scrub over your entire body for about 5 minutes. Do not use on your face. If possible, wait an additional 5 minutes before rinsing. Follow with an all-natural body lotion.

Moisturizing Shower Cream

Makes enough for one treatment

Start moisturizing before you step out of the shower. This creamy mixture is perfect after using a body scrub. It's filled with antioxidants and moisturizing ingredients to leave your skin feeling hydrated and silky smooth.

  • 1 cup water
  • 2 green tea bags
  • 1/3 cup old fashioned oats3 tablespoons honey
  • 2 tablespoons olive oil
  • 1/4 teaspoon grated orange zest
  • 1/4 teaspoon almond extract

Microwave 1 cup of water for 1 minute, or until hot. Steep two green tea bags for 5 minutes. In a bowl, combine 1/4 cup plus 1 tablespoon brewed tea and oats. Add honey, olive oil, orange zest and almond extract. Mix together until the mixture is completely combined. Shower as usual, use a body scrub if desired and rinse. Turn the shower head so you are not in the water. Slowly massage the moisturizer over your entire body. Let the moisturizer soak in for a least 5 minutes, the longer the better. Rinse.

Strawberry Fields Face Scrub

Makes enough for 2-3 treatments

This scrub gently sloughs off dead skin cells from your face, while nourishing your skin with anti-oxidant-filled strawberries and honey.

  • 1/2 cup old-fashioned oats, slightly ground
  • 5 small strawberries, well mashed or slightly pureed, about 1/4 cup (frozen strawberries work just as well, just defrost and proceed)
  • 2 tablespoons superfine granulated sugar (If you don't have this on hand, toss regular sugar into a food processor and pulse a few times)
  • 5 almonds, finely ground
  • 1 tablespoon honey
  • 1 tablespoon milk

Combine oats and strawberries. Stir in honey and milk, then sugar and almonds. Moisten face, gently massage face with about a tablespoon of scrub. Let the scrub sit for up to 10 minutes, the rinse with warm water and pat dry.

Tightening Face Mask

Makes enough for several treatments

The ginger and orange zest in this mask act as gentle astringents, while the egg whites tighten the skin.

  • 2 egg whites
  • 1 tablespoon milk
  • Pinch grated ginger root
  • 1/4 teaspoon grated orange zest

In a bowl, whip egg whites, milk, ginger and orange zest until frothy. Wash your face as normal and pat dry. Use your fingers to apply a light coating of the mask all over your face, avoiding your eyes. Let the mask dry for up to 15 minutes, then rinse with warm water and pat dry.

Conditioning Hair Mask

Makes enough for 2-3 treatments

This hair mask nourishes your hair with antioxidants and vitamins, and leaves your hair incredibly soft and shiny.

  • 1/4 cup plain or vanilla yogurt
  • 1/4 cup pureed pumpkin
  • 1 tablespoon olive oil
  • 1 tablespoon milk
  • 1 tablespoon coconut powder (If coconut powder is not readily available, use 1/2 tablespoon coconut milk instead)
  • 1 teaspoon honey
  • 1/2 teaspoon vanilla extract

In a bowl, combine yogurt, pumpkin and olive oil until the oil is fully incorporated. Stir in milk, coconut powder, honey and vanilla. Wash hair as normal, do not condition. Squeeze water out of hair, and coat hair with about 1 tablespoon (2 if your hair is very long or thick) of mask, starting from the bottom and working your way up. Let the mask sit for 5 minutes before rinsing. To deep condition your hair, coat your hair with 2 tablespoons of mask. Wrap your hair with plastic wrap, and then wrap a hair towel over the plastic wrap. Let the mask condition your hair for up to an hour before rinsing well with warm water.

Shiny Hair Rinse

Makes enough for one treatment

This rinse protects your hair with antioxidants and makes it incredibly shiny.

  • 2 cups water
  • 2 green tea bags
  • 2 black tea bags
  • 1 tablespoon orange juice
  • 1/4 teaspoon vanilla extract

Microwave two cups of water in separate cups, for 1 minute. Place green tea bags in one cup and black tea bags in the other cup. Steep for 5 minutes. Measure out 1/2 cup green tea, combine with 1 cup of black tea, orange juice and vanilla extract. Wash hair as usual. Right before getting out of the shower, squeeze the water out of your hair. Pour the rinse evenly over your hair. Let the rinse soak into your hair for a few minutes, then squeeze out your hair. Do not rinse.