Monday, March 22, 2010

Strawberry and Peach 'Sorbet'

The weather is getting warmer, which means one thing. Ice Cream season. Whats better on a hot day than a big bowl of creamy, sweet, melt-in-your mouth ice cream? Unfortunately, for healthy eaters, ice cream is one of those all-time favorites that has to be sacrificed in the name of health. Fortunately, there are healthy alternatives to ice cream, that even the most calorie-conscious eater can enjoy. Here's a simple recipe for a makeshift Strawberries and Peach Sorbet. It's insanely easy to make and extremely low calorie and practically fat free. I added just a teaspoon of flax to sneak in a bit of 'good' fat. You can't taste it, I promise! You can experiment with this recipe by adding other kinds of fruit. Frozen mangoes, blueberries and even raspberries make tasty additions. You can sweeten up the sorbet by adding sugar substitute, but I like the natural sweetness from the fruits. Enjoy!

Nutrition: Calories: 114 Carbohydrates: 23 g Fat: 1 g Protein: 5 g
Strawberry and Peach 'Sorbet'
Makes 1 bowl
3 ounces frozen peaches, about 7 medium slices
3 ounces frozen strawberries, about 7 strawberries
Skim milk, about 1/2 cup
1 teaspoon milled flax seed
1/2 - 1 teaspoon zero calorie sweetener (optional)
1. Place the frozen strawberries and 1/4 cup milk into a food processor or blender. Pulse until the strawberries are blended into a thick, slightly chunky consistency.
2. Next, add the peaches, flax, optional sweetener, and a bit more milk. (Because the fruits vary in size each time, slowly add the milk, making sure not to add too much...We want an ice cream consistency, not a smoothie!) Pulse again until all pieces of fruit are blended and have formed a thick sorbet.

3. Spoon into a bowl and serve with a fresh piece of fruit, or sprig of mint. Enjoy!

Tuesday, March 16, 2010

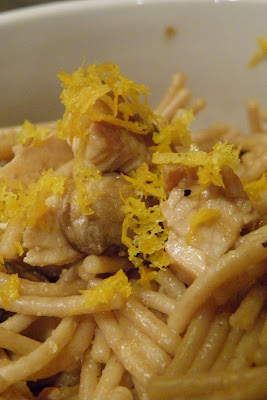
Orange and Ginger Chicken Lo Mein


I truly love Chinese food. Unfortunately, it's not something I can eat very often. With all the fat, carbs, and MSG, I definitely have to make it a special occasion. However, last night, the craving struck! I was so very tempted to spend my few dollars on Panda. But, I fought the urge, and set off to make my own Asian dinner. This dish reminds me of Lipton's 'Asian Side' noodles - the ones that come in a packet that you throw in the microwave. This dish actually turned out really, really well. It's not the prettiest dish, but the taste makes up for the lack of color! I'm so glad I was able to make a fatty, unhealthy dish into a light, low-calorie, healthy meal! The best part? All the ingredients you can probably find in your fridge or pantry. The one thing you may need to pick up is the sesame oil, but it lasts forever because a little goes a looong way. This dish takes a bit of multi-tasking, but nothing you can't handle! So, get cooking and enjoy!

Nutrition Information:
Calories: 346 Carbohydrates: 52g Fat: 6g Protein 31g

Orange and Ginger Chicken Lo Mein

2 ounces whole wheat spaghetti
1 Chicken breast, about 3 1/2 ounces
1 ounce baby bella mushrooms (about 7-8 slices), chopped
Orange zest
Marinade:
1 Tablespoon Orange juice
1/4 Teaspoon Sesame oil
1 Tablespoon Soy sauce
1 garlic clove, large, minced
Fresh ginger
Salt
black pepper
Sauce:
2 Tablespoons Orange juice
1/4 Teaspoon sesame oil
1 Tablespoon soy sauce
1 garlic clove, small, minced
1 teaspoon cornstarch

1. For the marinade, combine orange juice, sesame oil, soy sauce, garlic, and about 1/8 teaspoon freshly grated ginger in a plastic zip top bag.
2. Season the chicken breast with pepper and a pinch of salt.
3. Place the chicken in the marinade, and refrigerate for at least 15 minutes, up to 2 hours.
4. For the sauce: In a small sauce pan heat orange juice over low heat. Gradually whisk in cornstarch, until dissolved. Add sesame oil, soy sauce, and garlic. Whisk until the sauce has thickened, and remove from heat. Set aside.
5. Break the spaghetti noodles into 1 inch pieces, and prepare according to the direction on the package. Once cooked, drain, pour back in pan, set aside and cover.
6. While the spaghetti cooks, heat a skillet over medium heat. Lightly grease the pan with olive oil. Sear the chicken on both sides for about two minutes, lower the heat, and cover. Cook for 4-5 minutes, until the chicken is white all the way through.
7. Lightly coat the mushroom slices with olive oil and black pepper. Place in a small pan and broil at 450 until tender, about 3 minutes.
8. Chop the chicken into half inch pieces, and toss with the noodles, mushrooms and sauce.
9. Grate a pinch of orange zest over the top.
10. Enjoy!

Wednesday, March 10, 2010

Whole Wheat and Flax Mini Bagels


You may have noticed that I like carbohydrates. A lot. When people ask my favorite food, they expect to hear squash, steak, chicken. Nope, I answer 'Carbs.' I don't like a certain kind of food. I have a favorite food GROUP. I don't care what it is, as long as it has flour in it, I'll eat it. One of my favorite carb-filled-foods, though, is bagels. Actually, big, white, lightly toasted, cream-cheese covered bagels from Big Apple Bagel. My mouth is watering just thinking of it.

Since I've began my healthy eating habits, though, I've definitely ruled out bagels. I let myself splurge here and there, but bagels are basically big, center less, DELICIOUS, nutritional-lacking pieces of refined flour. Definitely not something that I want to 'spend' 400+ calories on...Especially since I'll feel hungry soon after, anyways. Yesterday, though, I was craving bagels. I easily could have gotten in my jeep, driven to the store, walked to the healthy aisle, and picked up a bag of whole wheat bagels...But that would be too easy!

No, I set out to make my very first homemade bagels. Healthy homemade bagels. I searched the internet for the most basic bagel recipe I could find, a formula, really. I found one and went to work. Making them was the easiest part- you basically just throw everything together and mix away. But the waiting for them to rise, boil, and bake? I was ravenous for a bagel!

Finally, they were done. I sliced into my mini bagel, carefully applied a bit of (healthy) butter, waited for it to melt in, and took a bite. My very hard tedious, and patient waiting paid off. My miniature bagel was warm, chewy, and full of flavor. And the best part? No guilt whatsoever. They're just big enough to hit the spot, and since they've got fiber, they're filling too. And since they're only 88 calories each, you can have two...Or three....

Nutrition: Calories: 88 Fat: .6g Sodium: 223mg Carbs: 18.7 Fiber: 2.9 Protein: 3.3


Whole Wheat and Flax Mini Bagels
Makes 20 mini bagels

1 1/2 cups tepid water (105-110 degree F)
1 packet active dry yeast
3 cups whole wheat flour
1 cup buckwheat flour
2 tablespoons milled flax
1 teaspoons sugar
1 1/2 teaspoons salt
1 tablespoon honey

1. Dissolve the yeast in the tepid water and set aside.
2. In a stand-up mixer bowl, combine flours, flax, salt, sugar and honey.
3. Add the yeast and water.
4. Using a dough hook, combine all on low speed for 2 minutes.
5. Increase the speed to medium low, and knead the dough for about 5 minutes. All the flour should be incorporated. If the dough separates while kneading, stop the mixer, fold the dough together, and turn the mixer back on.
6. Remove the dough from the bowl, form into a ball and place in a lightly oiled bowl. Cover with a tea towel, and let rise for 20-30 minutes.
7. Divide the dough into 20 1.5 balls.
8. Poke a hole in the center of each ball, and form into a bagel shape, turning in your hand to round the edges.
9. Preheat the oven to 425 degrees. Line a baking sheet with parchment paper.
10. Heat a large, shallow pot of water till boiling, and lower to a simmer. Drop 5 bagels in at a time. Cook for 30 seconds, flip the bagels, and cook another 30 seconds.
11. Remove the bagels from the water, and place on a wire cooling rack.
12. Repeat with the rest of the bagels, making sure to keep the water simmering.
13. Let the bagels just dry, and arrange on the parchment paper, an inch apart.
14. Bake for 7 minutes, rotate the pan, and bake another 5 minutes.
15. Remove and cool on a wire rack for 15 minutes.
16. Enjoy!

Thursday, March 4, 2010

Coconut Rice with Vegetables and Orange Chicken


I love the ocean. Actually, that's a lie. I'm terrified of large bodies of water- or moreover, what's in the water. The beach, though, is another story. The warm sand, the salty breeze, the sound of the rolling waves and the palm trees is what I live for. Nothing is better than the beach. However, the one thing that nearly compares? Beachy, tropical food. (Can you say fresh, coconut shrimp? YUM.) So tonight when I was having a strong aversion to the snow outside, I needed a bit of tropical- and FAST! What first came to mind? Coconut, of course! I have to admit, this recipe is a keeper. It's seriously easy to make, quick, and healthy, healthy, healthy! I know there's not a TON of tropical ingredients, so we'll call it...Tropical Style. This recipe is great when your cupboards are a bit bare or when you're in a rush to eat. Enjoy!
Calories: 331 Carbohydrates: 41 Fat: 5 Protein: 29
Coconut Rice with Vegetables and Orange Chicken
1/2 cup Instant brown rice
1/4 cup low-fat coconut milk
1/4 water
3.5 ounce chicken breast
1 tablespoon fresh orange juice
Sections of 1/4 orange
1 medium baby bella mushroom
1.5 ounce snap peas (About a handful)
1 garlic clove, finely minced
Paprika
Salt
Pepper
1. Season the chicken breast with salt, pepper, garlic and a liberal amount of paprika.
2. Prepare the rice according to box directions, using the water and coconut milk. (If the directions call for more or less liquids, just use equal amount of water and coconut.)
3. While the rice cooks, heat a small skillet over medium heat, and lightly coat with olive oil.
4. Sear the chicken for 2 minutes on each side. Lower the heat and pour the orange juice over the chicken. Cover, and cook thoroughly, about5 minutes or so.
5. Chop the peas and orange sections into 1/2 inch pieces, and dice the mushroom.
6. In a medium skillet over low heat, combine rice, oranges, peas and mushroom pieces.
7. When the chicken is cooked thoroughly, chop into 1/2 to 1 inch pieces, and toss with the rice and vegetables.
8. Eat and enjoy!

Wednesday, March 3, 2010

Apple Cinnamon Buckwheat Oatmeal Muffins


I really love muffins. They're warm, soft, and filling. Some of my favorite memories consist of waking up to the sweet swell of muffins on a cold winter morning. How comforting! However, most muffins are packed with fat, sugar and white flour- a health fanatics nightmare! My mission, though, is to 'healthify' otherwise unhealthy recipes! I first found a recipe for Oatmeal muffins on SparkPeople Recipes, but I wasn't crazy about them. They were a bit bland and I wanted to put a tasty spin on them. My inspiration for these was the Buckwheat pancakes I posted a while back. If you've never tried buckwheat flour, it may take some getting used to. It has it's own distinct taste, but I find it very tasty. These muffins are very soft, chewy, perfectly 'apple-y', with just enough cinnamon. And super healthy! They're great for breakfast or a snack with a spritz of spray butter or jam. By the way- they're super easy, so make some for now, later....and more for now! Enjoy!
Nutrition Info:
Calories: 112 Fat: .9 Cholesterol: .4 Sodium: 223 mg Carbohydrates: 23 Dietary Fiber: 2.5 Protein: 4
Apple Cinnamon Buckwheat Oatmeal Muffins
Makes 12 muffins
1 cup quick oats (Or old-fashioned if that's all you got)
1 cup skim milk
1/2 cup unsweetened apple sauce
1 medium apple
2 egg whites
2 teaspoons milled flax seed
1 cup buckwheat flour
1/2 cup brown sugar (spooned, not packed)
1 teaspoon cinnamon
1 teaspoon baking powder
1/2 teaspoon baking soda
1/2 teaspoon salt
Raisins - optional
nuts - optional
1/2 teaspoon sugar
1/2 teaspoon cinnamon

1. Combine the oats and milk, and set aside. (If using old-fashioned oats, soak for 1 hour)
2. Preheat the oven to 400 degrees.
3. Fill a muffin tin with 12 baking cups, and lightly spray with non-stick spray
4. Sift together the flax, flour, brown sugar, baking powder, baking soda, salt and 1 teaspoon cinnamon. (Add the optional ingredients now)
5. Grate the apple, and using a tea towel or cheese cloth, ring out the moisture.
6. Combine the oat mixture, apple sauce, grated apple, and egg whites.
7. Combine the dry ingredients with the wet ingredients, mixing until just combine.
8. Evenly divide the batter between the baking cups
9. Combine the 1/2 teaspoon of cinnamon and 1/2 teaspoon sugar and sprinkle over the top of each muffin.
10. Bake for 20-25 minutes, until lightly brown on top.
11. Remove from oven, cool, and enjoy!
Store in a zip top bag. These also freeze well.